We at Astiostech use Asternic (www.asternic.biz) quite extensively for basic call centres that require a simple interface for wallboards, reports and recordings.
Asternic also provides some capabilities to monitor outbound callcenters where agents make random calls to introduce new services or businesses.
In this guide, i will attempt to setup outbound call center setup using Asternic and at the same time, show you how to enable recordings that play straight off the Asternic web UI.
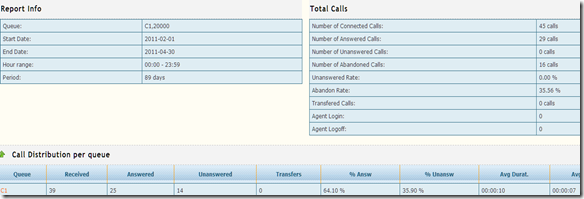
This guide assumes the use of Asternic 1.8, FreePBX 2.x and Asterisk 1.6 on Debian systems. I also assume you’ve got all else working with Asternic like, the ioncube loaders, the license and the website is showing you like below;
If yes, great, login with admin and the default password admin.

PART 1 – ENABLING OUTBOUND MONITORING
1) Firstly, you must get a valid licensed and a 1.8 version of Asternic. Write to [email protected] and Nicolas will help you get those.
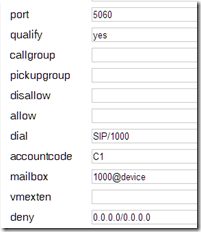
2) The way Asternic identifies if a particular someone is part of the outbound campaign is by looking for the accountcode value in SIP user as shown below in the FreePBX user configuration. In deviceuser mode, this would be the device, not user.

Here, i am creating an account code called C1 which is my outbound campaign 1. If you put things in perspective of an inbound this would then be a queue name. So all defined as C1 in their account code will then be agents of the queue C1. Simple as that right?
3) Next is to make some dialplan changes in FreePBX. There’s a file available from Asternic’s install source (/usr/src/asternic.source.dir/FreePBX/extensions_custom_asternic_outbound_freepbx.conf). Copy this file to /etc/asterisk. Now make sure the asterisk user owns this file since it was newly added.
Now edit it, and modify like below below.
IMPORTANT, THERE’S A SMALL OUTDATED LINE YOU NEED TO MODIFY. EDIT THE extensions_custom_asternic_outbound_freepbx.conf LIKE SHOWN BELOW; there’s one part which calls the mixmonitor dialplan, change the | pipes to , commas. Asterisk 1.4 and above will not accept pipes anymore.
| exten => _X.,n,MixMonitor(${QDIALER_QUEUE}-${UNIQUEID}.wav|b|/usr/local/parselog/update_mix_mixmonitor.pl ${UNIQUEID} ${QDIALER_QUEUE}-${UNIQUEID}.wav) change to exten => _X.,n,MixMonitor(${QDIALER_QUEUE}-${UNIQUEID}.wav,b,/usr/local/parselog/update_mix_mixmonitor.pl ${UNIQUEID} ${QDIALER_QUEUE}-${UNIQUEID}.wav) |
4) Edit /etc/asterisk/extensions_customs.conf and include the above file.
At the very top of extensions_customs.conf, add the line
#include extensions_custom_asternic_outbound_freepbx.conf
Now, if you have followed the INSTALL guide inside the binary archive. It will tell you to place a parselog into /usr/local/parselog/
Inside this directory, there’s an important perl file called update_mix_mixmonitor.pl which converts the WAV file to MP3 so that it can be played using the Asternic GUI (we will show you howto with that later). Make sure you edit this file.
edit /usr/local/parselog/update_mix_mixmonitor.pl
In there, make sure you
1) edit the database connection information, like the username and password particularly
2) edit the asterisk spool location (normally /var/spool/asterisk/monitor).
3) edit the destination dir (create one like /var/spool/asterisk/monitor-mp3)
4) Then go to the end of that file to the lame execution part (to convert WAV to MP3). Make sure the path to lame is correct.
Permission. Now pay attention to this!. Make sure you set the permissions correctly.
chown –R asterisk:asterisk /var/spool/asterisk/monitor
chown –R asterisk:asterisk /var/spool/asterisk/monitor-mp3
chown asterisk:asterisk /usr/local/bin/lame
Now, reload the dialplan, #asterisk –rx “dialplan reload”.
That should do the trick. Make sure you define the account code for the extension/device which need tracking and make that outbound call. Remember, these codes invoke dialout trunk prehook dialplan in FreePBX so internal calls won’t be tracked and if you have sip trunks and what not, make sure you set the correct context to those trunks. After making a couple of calls, you should see this;

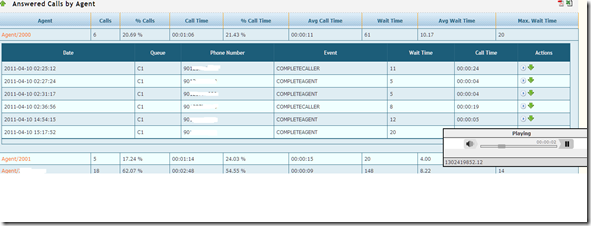
Where C1 was my accountcode and Agent is my Outbound CID. I made some changes in the dialplan however to reflect the user/extension and not the Outbound CID. (email me if you need the codes for that)

As seen above, you can see the details of the calls being made by those in C1 “queue” or accountcode.
PART 2 – ENABLE WEB BASED CALL RECORDINGS FOR INBOUND
Now, as part of Asternic’s offering, you can rightfully with the above steps done properly, be able to see the recordings on the webUI. The only thing you need to do is add a value in the SETUP tab and look for the recordings_path parameter and set it to the destination directory as defined up there.

By using the above extra file called extensions_custom_asternic_outbound_freepbx.conf…. file by Asternic, all outbound calls with the accountcode defined will be recorded, of course, you can turn that off by commenting out the mixmonitor dialplan function but i am sure you would want to have that function for training and QA purposes right? Unlike the inbound Queues module in FreePBX, you can choose to record or not to record from the WebUI.
So, if all turns up well, you can see your recordings and play or download it straight from the Web! You need flash to play back by the way and use Firefox for best results.

At Astiostech, we do lots of customization of Asternic and call centre based solutions like Aheeva, Majuda that would suite just about any CallCenter types or sizes! Do write or calls us.
[email protected]
Or call us + 60 3 86892800
Sanjay W
From the engineering desk of Astiostech.
